gdal raster blend
Added in version 3.12.
Blend/compose two raster datasets
Synopsis
Usage: gdal raster blend [OPTIONS] <COLOR-INPUT> <OVERLAY> <OUTPUT>

Blend/compose two raster datasets

Positional arguments:
  -i, --color-input, --input <COLOR-INPUT>             Input raster dataset [required] [not available in pipelines]
  --overlay <OVERLAY>                                  Overlay dataset [required]
  -o, --output <OUTPUT>                                Output raster dataset [required] [not available in pipelines]

Common Options:
  -h, --help                                           Display help message and exit
  --json-usage                                         Display usage as JSON document and exit
  --config <KEY>=<VALUE>                               Configuration option [may be repeated]
  -q, --quiet                                          Quiet mode (no progress bar or warning message) [not available in pipelines]

Options:
  -f, --of, --format, --output-format <OUTPUT-FORMAT>  Output format ("GDALG" allowed) [not available in pipelines]
  --co, --creation-option <KEY>=<VALUE>                Creation option [may be repeated] [not available in pipelines]
  --overwrite                                          Whether overwriting existing output dataset is allowed [not available in pipelines]
                                                       Mutually exclusive with --append
  --append                                             Append as a subdataset to existing output [not available in pipelines]
                                                       Mutually exclusive with --overwrite
  --operator <OPERATOR>                                Composition operator. OPERATOR=src-over|hsv-value|multiply|screen|overlay|hard-light|darken|lighten|color-dodge|color-burn (default: src-over)
  --opacity <OPACITY>                                  Opacity percentage to apply to the overlay dataset (0=fully transparent, 100=full use of overlay opacity) (default: 100)

Advanced Options:
  --if, --input-format <INPUT-FORMAT>                  Input formats [may be repeated] [not available in pipelines]
  --oo, --open-option <KEY>=<VALUE>                    Open options [may be repeated] [not available in pipelines]
Description
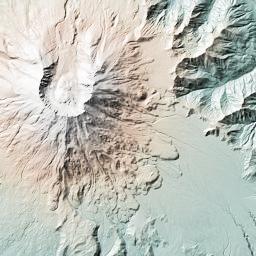
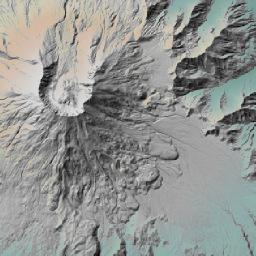
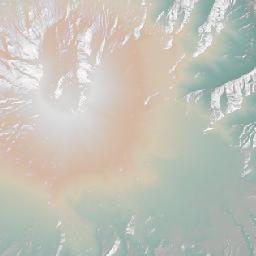
gdal raster blend allows the user to compose two raster datasets (of the same size) using a selected blending operation and an opacity setting.
This can be used for example to colorize a hillshade raster generated by
gdal raster hillshade with an hypsometric rendering of a DEM generated
by gdal raster color-map when using the hsv-value blending operator.
The more standard src-over blending operator, which does "alpha blending"
is also available.
This subcommand is also available as a potential step of gdal raster pipeline
GDALG output (on-the-fly / streamed dataset)
This program supports serializing the command line as a JSON file using the GDALG output format.
The resulting file can then be opened as a raster dataset using the
GDALG: GDAL Streamed Algorithm driver, and apply the specified pipeline in a on-the-fly /
streamed way.
Program-Specific Options
- --input <INPUT>
Name of the dataset into which to blend the overlay dataset. Required.
When using the
hsv-valueblending operator, this must be a three-band or four-band Byte raster.
- --opacity <OPACITY>
Opacity to use when blending the overlay dataset, as a percentage between 0 and 100. 0 means that the overlay dataset is considered fully transparent. 100 means that the overlay dataset is blended at the maximum of its alpha channel. Defaults to 100.
- --operator src-over|hsv-value|multiply|screen|overlay|hard-light|lighten|darken
Select the blending operator, which defines how the overlay dataset is blended into the input dataset. Defaults to
src-over.See Details of blending operations below for details about each operator.
- --overlay <OVERLAY>
Name of the overlay dataset. Required
Standard Options
Details
- --append
Append input raster as a new subdataset to an existing output file. Only works with drivers that support adding subdatasets such as GTiff -- GeoTIFF File Format and GPKG -- GeoPackage raster This also creates the output dataset if it does not exist yet.
- --co, --creation-option <NAME>=<VALUE>
Many formats have one or more optional creation options that can be used to control particulars about the file created. For instance, the GeoTIFF driver supports creation options to control compression, and whether the file should be tiled.
May be repeated.
The creation options available vary by format driver, and some simple formats have no creation options at all. A list of options supported for a format can be listed with the --formats command line option but the documentation for the format is the definitive source of information on driver creation options. See Raster drivers format specific documentation for legal creation options for each format.
- --if, --input-format <format>
Format/driver name to be attempted to open the input file(s). It is generally not necessary to specify it, but it can be used to skip automatic driver detection, when it fails to select the appropriate driver. This option can be repeated several times to specify several candidate drivers. Note that it does not force those drivers to open the dataset. In particular, some drivers have requirements on file extensions.
May be repeated.
- --oo, --open-option <NAME>=<VALUE>
Dataset open option (format specific).
May be repeated.
- -f, --of, --format, --output-format <OUTPUT-FORMAT>
Which output raster format to use. Allowed values may be given by
gdal --formats | grep raster | grep rw | sort
- --overwrite
Allow program to overwrite existing target file or dataset. Otherwise, by default, gdal errors out if the target file or dataset already exists.
Details of blending operations
In the description of the blending operations, all values are normalized to [0,1] range and each channel value is premultiplied with the alpha channel value.
The following notations are used:
\(overlay_{C}\) is the value of one of the red, green or blue component of the overlay dataset,
\(overlay_{A}\) is the value of the alpha component of the overlay dataset premultiplied by
--opacity,\(input_{C}\) is the value of the corresponding component of the input dataset,
\(input_{A}\) is the value of the alpha component of the input dataset
\(output_{C}\) is the resulting component of the output dataset,
\(opacity\) is the value of
--opacity
Note
For efficiency, the implementation uses integer arithmetic on [0,255] range rather than floating point arithmetic on [0,1] range. This can explain minor differences with the formulas described below.
For all operator (unless otherwise specified) the alpha channel is computed as:
The following blending operators are available:
Operator |
Description |
Example |
|---|---|---|
|
Standard alpha blending (overlay composited over input) |
|
|
Uses value from overlay and hue/saturation from input |
|
|
Multiplies input and overlay colors |
|
|
Complement then multiply colors |
|
|
Combines multiply and screen |

|
|
Multiply or screen depending on overlay brightness |
|
|
Keeps the minimum of input and overlay components |
|
|
Keeps the maximum of input and overlay components |
|
|
Brightens input based on overlay |
|
|
Darkens input based on overlay |
|
src-overperforms standard alpha blending, by compositing the overlaydataset over the input dataset.
The following formula is applied for each of the red, green and blue components:
\[output_{C} * output_{A} = (overlay_{C} * overlay_{A} * opacity) + (input_{C} * input_{A} * (1 - overlay_{A} * opacity))\]
hsv-valuecreates a color with the value of the overlay and the hueand saturation of the input. It performs the following steps:
read the RGB (Red,Green,Blue) components of the input dataset
transform the RGB components into the HSV (Hue,Saturation,Value) color space
compute the output value \(output_{V}\), using the following formula:
\[output_{V} = (overlay_{V} * overlay_{A} * opacity) + (input_{V} * (1 - overlay_{A} * opacity))\]If the overlay dataset is a RGB/RGBA dataset, \(overlay_{V}\) is \(max(overlay_{R},overlay_{G},overlay_{B})\).
transform back (Hue,Saturation,:math:output_{V}) to RGB.
If the the alpha channel of the input dataset is present, it is preserved unchanged.
multiplymultiplies the input and overlay colors.The resulting color is always at least as dark as either of the two constituent colors.
The following formula is applied for each of the red, green and blue components:
\[output_{C} = overlay_{C} * input_{C} + input_{C} * (1 - overlay_{A}) + overlay_{C} * (1 - input_{A})\]
screenThe overlay and input are complemented and then multiplied. The resultant color is always at least as light as either of the two constituent colors. Screening any color with white produces white. Screening any color with black leaves the original color unchanged.The following formula is applied for each of the red, green and blue components:
\[output_{C} = overlay_{C} + input_{C} - overlay_{C} * input_{C}\]overlayOverlay combines Multiply and Screen blend modes, at half strength. The parts of the overlay layer where the input layer is light become lighter, the parts where the input layer is dark become darker. Areas where the overlay layer are mid grey are unaffected.The following formula is applied for each of the red, green and blue components:
If the input component is less than 0.5 (dark):
\[output_{C} = 2 * overlay_{C} * input_{C} + input_{C} * (1 - overlay_{A}) + overlay_{C} * (1 - input_{A})\]If the input component is greater than or equal to 0.5 (light):
\[output_{C} = overlay_{A} * input_{A} - 2 * (input_{A} - input_{C}) * (overlay_{A} - overlay_{C}) + input_{C} * (1 - overlay_{A}) + overlay_{C} * (1 - input_{A})\]hard-lightThe overlay is used to either multiply or screen the input, depending on the overlay color value. If the overlay color value is lighter than 50% gray, the input is screened, otherwise it is multiplied. This is useful for adding highlights or shadows to an image. The implementation is the same ofoverlaybut with the roles of input and overlay swapped.The following formula is applied for each of the red, green and blue components:
If the overlay component is less than 0.5 (dark):
\[output_{C} = overlay_{A} * input_{A} - 2 * (input_{A} - input_{C}) * (overlay_{A} - overlay_{C}) + input_{C} * (1 - overlay_{A}) + overlay_{C} * (1 - input_{A})\]If the overlay component is greater than or equal to 0.5 (light):
\[output_{C} = 2 * overlay_{C} * input_{C} + input_{C} * (1 - overlay_{A}) + overlay_{C} * (1 - input_{A})\]darkenCreates a image that retains the smallest components of the overlay and input pixels. If the overlay pixel has the components r1, g1, and b1, and the input pixel has r2, g2, b2, the resultant pixel is [min(r1,r2), min(g1,g2), min(b1,b2)]The following formula is applied for each of the red, green and blue components:
\[output_{C} = min(overlay_{C}, input_{C}) + input_{C} * (1 - overlay_{A}) + overlay_{C} * (1 - input_{A})\]lightenLighten has the opposite action of Darken. It selects the maximum of each component from the overlay and input pixels. If the overlay pixel has the components r1, g1, and b1, and the input pixel has r2, g2, b2, the resultant pixel is [max(r1,r2), max(g1,g2), max(b1,b2)]The following formula is applied for each of the red, green and blue components:
\[output_{C} = max(overlay_{C}, input_{C}) + input_{C} * (1 - overlay_{A}) + overlay_{C} * (1 - input_{A})\]color-dodgeDivides the input layer by the inverted overlay layer. This lightens the input layer depending on the value of the overlay layer: the brighter the overlay layer, the more its color affects the input layer. Blending any color with white gives white. Blending with black does not change the image.The following formula is applied for each of the red, green and blue components:
If the \(overlay_{C} * input_{A}\) is greater than or equal to \(overlay_{A} * input_{A}\) then:
\[output_{C} = overlay_{A} * input_{A} + input_{C} * (1 - overlay_{A}) + overlay_{C} * (1 - input_{A})\]If the \(overlay_{C} * input_{A}\) is less than \(overlay_{A} * input_{A}\) then:
\[output_{C} = input_{C} * overlay_{A} / (1 - overlay_{C} / overlay_{A}) + overlay_{C} * (1 - input_{A}) + input_{C} * (1 - overlay_{A})\]color-burnDivides the inverted input layer by the overlay layer, and then inverts the result. This darkens the overlay layer increasing the contrast to reflect the color of the input layer. The darker the input layer, the more its color is used.The following formula is applied for each of the red, green and blue components:
If the \(overlay_{C} * input_{A}\) is greater than or equal to \(overlay_{A} * input_{A}\) then:
\[output_{C} = overlay_{A} * input_{A} + input_{C} * (1 - overlay_{A}) + overlay_{C} * (1 - input_{A})\]If the \(overlay_{C} * input_{A}\) is greater than \(overlay_{A} * input_{A}\) then:
\[output_{C} = input_{C} * overlay_{A} / (1 - overlay_{C} / overlay_{A}) + overlay_{C} * (1 - input_{A}) + input_{C} * (1 - overlay_{A})\]
Return status code
The program returns status code 0 in case of success, and non-zero in case of error (non-blocking errors emitted as warnings are considered as a successful execution).
Examples
Example 1: Alpha blending of two datasets using 75% opacity for the overlay dataset.
$ gdal raster blend --opacity 75 source.tif overlay.tif out.tif
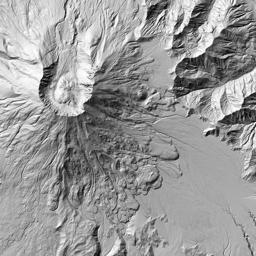
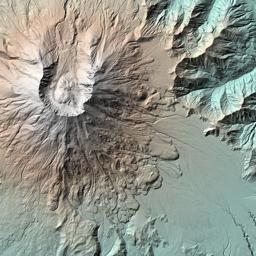
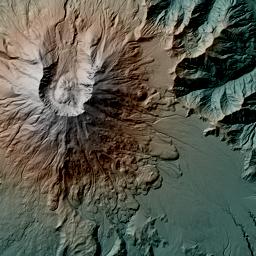
Example 2: Combine a hillshade and a hypsometric rendering of a DEM into a colorized hillshade using the hsv-value blending operator.


$ gdal raster blend --overlay=hillshade.tif --operator=hsv-value \
                    hypsometric.tif hypsometric_combined_with_hillshade.tif
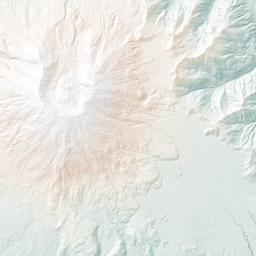
Example 3: Combine a hillshade and a hypsometric rendering of a DEM into a colorized hillshade using the multiply blending operator.
$ gdal raster blend --overlay=hillshade.tif --operator=multiply \
                    hypsometric.tif hypsometric_combined_with_hillshade.tif
Example 4: Combine a hillshade and a hypsometric rendering of a DEM into a colorized hillshade using the screen blending operator.
$ gdal raster blend --overlay=hillshade.tif --operator=screen \
                    hypsometric.tif hypsometric_combined_with_hillshade.tif
Example 5: Combine a hillshade and a hypsometric rendering of a DEM into a colorized hillshade using the overlay blending operator.
$ gdal raster blend --overlay=hillshade.tif --operator=overlay \
                    hypsometric.tif hypsometric_combined_with_hillshade.tif
Example 6: Combine a hillshade and a hypsometric rendering of a DEM into a colorized hillshade using the hard-light blending operator.
$ gdal raster blend --overlay=hillshade.tif --operator=hard-light \
                    hypsometric.tif hypsometric_combined_with_hillshade.tif
Example 7: Combine a hillshade and a hypsometric rendering of a DEM into a colorized hillshade using the darken blending operator.
$ gdal raster blend --overlay=hillshade.tif --operator=darken \
                    hypsometric.tif hypsometric_combined_with_hillshade.tif
Example 8: Combine a hillshade and a hypsometric rendering of a DEM into a colorized hillshade using the lighten blending operator.
$ gdal raster blend --overlay=hillshade.tif --operator=lighten \
                    hypsometric.tif hypsometric_combined_with_hillshade.tif
Example 9: Combine a hillshade and a hypsometric rendering of a DEM into a colorized hillshade using the color-dodge blending operator.
$ gdal raster blend --overlay=hillshade.tif --operator=color-dodge \
                    hypsometric.tif hypsometric_combined_with_hillshade.tif
Example 10: Combine a hillshade and a hypsometric rendering of a DEM into a colorized hillshade using the color-burn blending operator.
$ gdal raster blend --overlay=hillshade.tif --operator=color-burn \
                    hypsometric.tif hypsometric_combined_with_hillshade.tif